🚀 Step-by-Step Gas Stove Cleaning Method
Follow these simple steps to get your gas stove sparkling clean with minimal effort!
Step 1: Remove Grates & Burner Caps
Start by removing the grates and burner caps. Soak them in a basin of hot, soapy water for at least 15 minutes. This will loosen up grease and any stuck-on debris. You can use a gentle dish soap, or if you want a deeper clean, try a degreasing dish detergent.
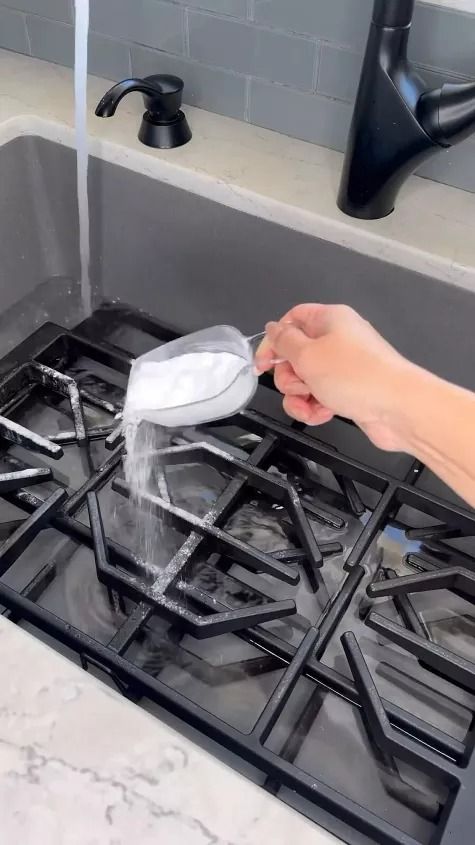
Step 2: Make a Powerful Cleaning Paste
Mix baking soda with water to form a thick paste. Apply this paste directly to the greasy spots on your stove. Let it sit for 10-15 minutes to lift up all the stubborn grease and grime.
Step 3: Spray with White Vinegar
Now, spray white vinegar over the baking soda paste. The bubbling reaction is a sign that the paste is lifting dirt and grime from your stove. Let the vinegar fizz for a few seconds, then wipe everything down with a sponge or cloth. Make sure to cover every area of the stove, including the edges, knobs, and any burners.
Step 4: Scrub the Burners & Grates
After soaking the grates and burners, use a scrub brush or an old toothbrush to scrub off any remaining grease and grime. Don’t forget to clean the small areas that are hard to reach. Rinse everything thoroughly and let it dry.
Step 5: Clean the Knobs & Control Panel
The stove knobs and control panel are usually the most touched parts of the stove. Use a cloth dampened with a vinegar-water solution to clean these parts. Be careful not to spray liquid directly on electrical components.
Step 6: Dry & Reassemble
Once everything is clean, dry the stovetop and grates with a dry cloth or paper towels. Then, reassemble the stove by replacing the burner caps and grates. Your stove should now be shining like new!
✨ Additional Tips for Keeping Your Gas Stove Sparkling Clean
Here are some extra tips to maintain your stove’s cleanliness and ensure it stays in top shape:
- Wipe Spills Immediately: Don’t wait for spills to harden. Wipe them down as soon as they happen to prevent grease buildup.
- Regular Weekly Cleaning: Make cleaning your gas stove a weekly habit to prevent buildup from becoming a bigger chore.
- Use a Microfiber Cloth for Buffing: After cleaning, buff the stove with a microfiber cloth for extra shine. This will leave it looking glossy and new.
💡 Why This Cleaning Method is Effective
Using natural ingredients like baking soda and white vinegar is not only effective but also eco-friendly. These ingredients are gentle on your stovetop but tough on grease, making them perfect for routine cleaning without the need for harsh chemicals. Plus, this method saves you money by using what you already have in your kitchen!
How Often Should You Clean Your Gas Stove?
It’s essential to clean your gas stove at least once a week to maintain its performance and keep your kitchen looking clean. If you cook frequently, especially with greasy or sugary foods, you may need to clean it more often to prevent grease buildup. A quick wipe-down after each cooking session will help maintain its shine and prevent heavy buildup over time.
🚨 Frequently Asked Questions About Gas Stove Cleaning:
Q: Can I use harsh chemicals to clean my gas stove?
A: While it’s tempting to use commercial cleaners, they often contain harmful chemicals that can damage your stove and pose health risks. It’s better to stick with natural cleaning products like vinegar and baking soda for safe and effective cleaning.
Q: How do I remove burnt food from my stove?
A: Burnt food can be tough to remove, but soaking it with hot water and baking soda should help loosen it. For more stubborn spots, a gentle scrub with a toothbrush and vinegar will usually do the trick.
Q: How do I clean the burners on my gas stove?
A: After soaking your burners in soapy water, use a toothbrush to scrub away any stuck food particles or grease. Make sure to clean the holes on the burner caps to prevent clogging.
Conclusion
Cleaning your gas stove doesn’t have to be a laborious task. With this easy, effective method, you can deep clean your stove and keep it looking brand new for longer. By using natural cleaning products you already have in your home, you’ll save time, money, and effort while ensuring your stove performs optimally.
Don’t forget to bookmark this guide for your next deep-cleaning session! And if you found these tips helpful, share this post with friends and family or leave a comment below with your own cleaning tips!
